
Requirements
Find your Wii’s MAC address. Then visit the [] and enter in the MAC address to download the customized exploit package. Cut the red wire.
Step 2
Format your SD card so that it is FAT32. In Windows this is very easy to do. Right-click on the SD card drive from My Computer or Windows Explorer and select “Format.” Change the file system option to FAT32, leave the rest of the settings at default, and then click Start.
Note: Formatting the card will erase all data that is currently on it. Back up anything you don’t want to lose before you format.
Step 3
.
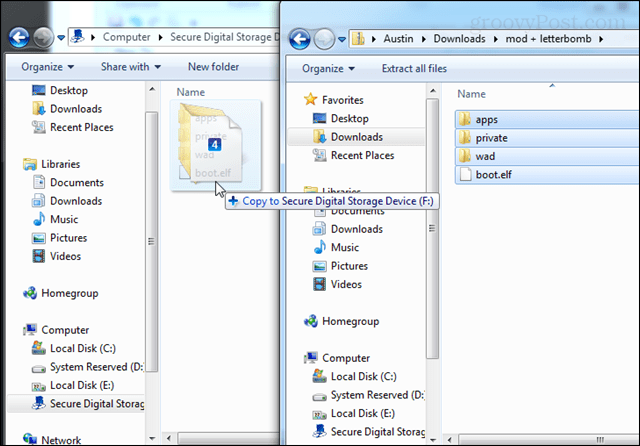
Extract both the modpack and LetterBomb so that the contents of these zip files are on the SD card. Do not save the zip files themselves to the SD card, only the contents.
Step 4
Step 5 (Important)
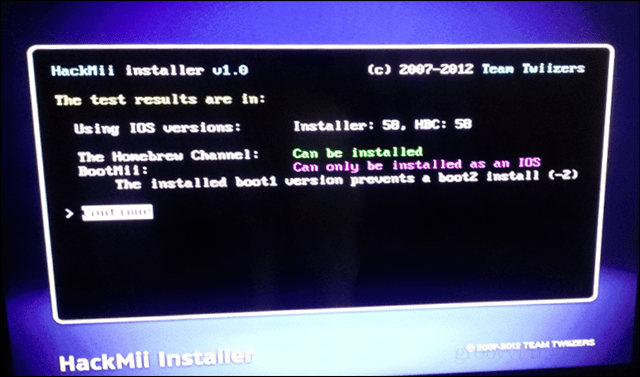
Make a backup, if something breaks or bricks you’ll be very happy to have one. This is done through Bootmii. If you left the Hackmii installation settings at their default you likely installed Bootmii as a boot2. This means to open up Bootmii you’ll need to do it through the Homebrew Channel.
Step 6
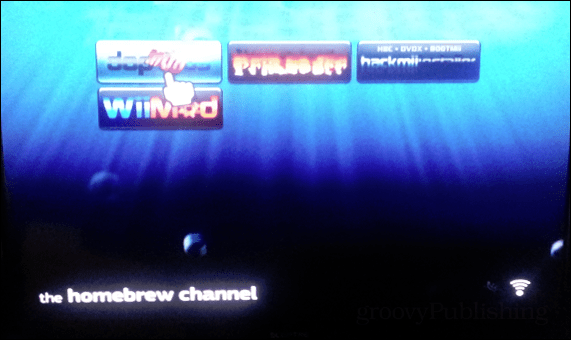
Back in the Homebrew channel, launch the Wii Mod Batch. it should be the first title listed on the screen. It will automatically install everything.
Step 7
Launch Priiloader from the Homebrew channel. It’s the weird looking one with orange text. After it is loaded:
The Wii is now jailbroken and modded out. You can now do just about anything you want with it. One of the suggested things to do is pick up a external USB hard drive (reformatted to FAT32) and connect it to the Wii. We’ll cover that in another article. In the meantime here are a few utilities that are worth downloading to the SDcard or to the external hard drive once you set it up. If you save them to the SD card they can be launched via the Homebrew Channel.
- 1GB SD card (non-SDHC if possible)
- Computer with internet connection & SD card reader.
- Wii console
- Wii firmware version 4.3 (open the Wii system options and this appears at the top-right)
Find your Wii’s MAC address. Then visit the [] and enter in the MAC address to download the customized exploit package. Cut the red wire.
- Keep the checkbox “Bundle the HackMii installer” ticked when using the LetterBomb site.
- Select the firmware version that matches yours.
- Your MAC address is listed in the Wii system options. It is located in the menu at “Internet” (page two), and then under “Console Information.” []
Step 2
Format your SD card so that it is FAT32. In Windows this is very easy to do. Right-click on the SD card drive from My Computer or Windows Explorer and select “Format.” Change the file system option to FAT32, leave the rest of the settings at default, and then click Start.
Note: Formatting the card will erase all data that is currently on it. Back up anything you don’t want to lose before you format.
Step 3
.
Extract both the modpack and LetterBomb so that the contents of these zip files are on the SD card. Do not save the zip files themselves to the SD card, only the contents.
Step 4
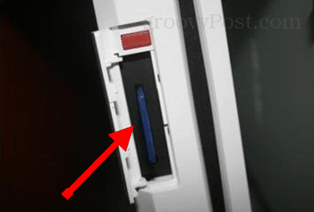
- Insert the SD card.
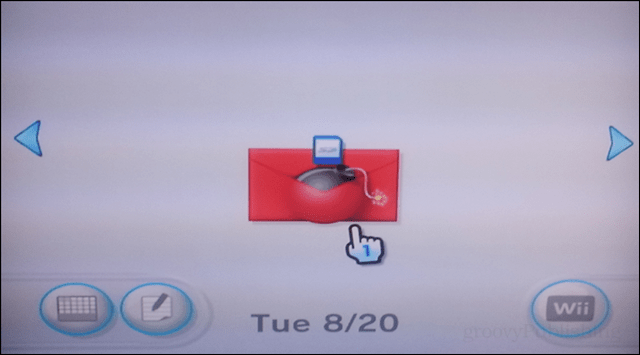
- Open the Wii system messages and browse to yesterday’s messages. The LetterBomb icon should show up. Click it with the Wii remote pointer.
Step 5 (Important)
Make a backup, if something breaks or bricks you’ll be very happy to have one. This is done through Bootmii. If you left the Hackmii installation settings at their default you likely installed Bootmii as a boot2. This means to open up Bootmii you’ll need to do it through the Homebrew Channel.
- Open the Homebrew channel and press the Home button on the Wiimote. Launch Bootmii.
- Bootmii doesn’t use the Wii remote so you’ll need to use the buttons on the console itself for this part. You can also use a gamecube controller if you have one.
- Press the power button on the Wii console 3 times to go to the last option. And then press the reset button to select it.
- Press reset to choose the first option. Follow what it says onscreen to proceed with creating the backup.
- The backup is saved to the SD card.
Step 6
Back in the Homebrew channel, launch the Wii Mod Batch. it should be the first title listed on the screen. It will automatically install everything.
Step 7
Launch Priiloader from the Homebrew channel. It’s the weird looking one with orange text. After it is loaded:
- Push + on the Wiimote to install Priiloader.
- Next simultaneously hold Rest + Power on the console itself to restart the Wii into Priiloader.
- Enable the following hacks (and any others you want):
- Auto press A at health screen
- Region free everything
- Block disc updates
- Block online updates
- Remove NoCopy save file protection
The Wii is now jailbroken and modded out. You can now do just about anything you want with it. One of the suggested things to do is pick up a external USB hard drive (reformatted to FAT32) and connect it to the Wii. We’ll cover that in another article. In the meantime here are a few utilities that are worth downloading to the SDcard or to the external hard drive once you set it up. If you save them to the SD card they can be launched via the Homebrew Channel.
- (for Windows)
- A must-have windows application for managing, compressing, decompressing, and burning disc copies of game backups.
- Plays burnt backup discs. (The site is in german but the plugin is English.)
- An open-source loader for USB files on an external hard drive.
- This is a pack of emulators and USBloader for running games from a USB drive. Allows you to play NES, SNES, Sega, Gameboy, N64 and other ROMS.
- same as the above except it’s designed for compressed wbfs files.